The Code Behind Our New Video Homepage
September 23, 2014
Topic tags
Our homepage changes fairly regularly, and one iteration included a fullscreen video background with a single call-to-action to watch a fullscreen video.
We really wanted to show off our product and put video front and center since it’s so important to us (as a video company).
In this post, we’re going to show how you can achieve the same fullscreen effect with your Wistia-hosted video, along with some considerations to be aware of for using a background video like this one.
The code for our homepage is pretty much like the code for any other webpage you’ve ever created. It’s a series of HTML elements layered on top of each other with a bit of Javascript magic. The homepage can be in three different states during a visitor’s visit.
When a visitor first loads the page, we try to load all the assets as quickly as possible. Since videos don’t load right away, we load the video thumbnail first so the visitor has something to see. A simple image file can load on the page more quickly than a full video embed. You can see an example of this in the diagram below. The green areas are transparent, so in this first state, the visitor cannot see the background video or the overlay video because the video thumbnail blocks their view. This gives us time to load the video and then move on to state two.
In state two, we switch the positions of the background video and video thumbnail. Once the video switches positions to be in front of the thumbnail, we start playing the video. This creates the effect that the video was just paused during loading. Without these two steps, our visitors would only see a white background until the video loads.
In state three, the visitor has clicked the play button, and we bring the overlay video to the front of the stack. This blocks the view of the text and play button and makes only the overlay video viewable. When the visitor exits the video, the page returns to state two.
Now that we’ve outlined the different states our page can be in, let’s talk about the code that you’ll need to make things happen.
Wistia setup: configuring your embeds
To get started, you’ll need to create a new project in your Wistia account. Upload a video that has no sound for your background video. In the Controls section of Customize, enable “Autoplay video on page load,” with video behavior at the end set to “Loop the video.”
The second video you need is the overlay video, which will appear when your visitor clicks on the play button. The overlay video does not need any special customization.
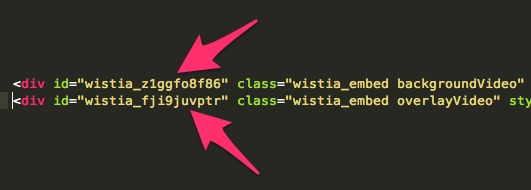
The second task you’ll need to take care of in Wistia is making note of your video IDs. These video IDs will be needed in some of the steps below, and can be found in the following location:
Last, download the thumbnail for your background video and save it to the images folder. You can do that by clicking “Download” under the “Video Actions” menu on your video’s page in Wistia, and selecting the Image file. Your videos are now ready to be embedded in the page template. Next, we’ll add these videos to the HTML template so your visitors can view them.
HTML: the basic container
If you want to make your life a little easier, the Github repository below holds the sample code you need to get this project going fast:
First, you’ll need a basic container to hold the two videos, text, and play button. I’ve laid it out very similarly to this:
<div id="video_container">
  <div id="text">
    <div id="actions">
      <div id="playbutton">
        <div class="rectangle"></div>
        <div class="triangle"></div>
      </div>
    </div>
  </div>
  <div id="cover_all"></div>
  <div id="main-image"></div>
  <div id="wistia_z1ggfo8f86" class="wistia_embed backgroundVideo" style="width:920px;height:518px;"></div>
  <div id="wistia_fji9juvptr" class="wistia_embed overlayVideo" style="width:1920px;height:1080px;"></div>
  <div id="ex"><img src="images/ex.svg" width="23" height="23"></div>
</div>
The background video is contained within the div with the class “backgroundVideo,” and the video that takes over the screen in the popup is contained by the div with the class “overlayVideo.” To make this snippet work for your videos (instead of Wistia’s), you need to replace the sample video IDs with the video IDs that you took note of earlier. Look at the embed code for your videos to find the IDs you will need.

Last, add the normal Wistia embed Javascript, which will power the videos on your new page along with the Crop Fill plugin from Wistia Labs.
As you can see, there isn’t really much to the HTML. Next, we’ll talk about the complex Javascript that controls the videos’ appearance on your site.
Javascript: adding complex interactions
The Javascript is really what makes this background video effect possible, and it also adds some complexity to your project. I’ve made sure that the code is well-commented, but I’ll try to walk through each major piece in more depth here to demonstrate what’s going on.
The first thing you should notice is a set of 4 variables that you’ll need to change and define with your video IDs and the containers that hold those videos. The code snippet you need to change looks like this:
overlayVideo: 'fji9juvptr',
overlayVideoDiv: '#wistia_fji9juvptr',
backgroundVideo: 'z1ggfo8f86',
backgroundVideoDiv: '#wistia_z1ggfo8f86',
With that change, you shouldn’t have to touch the rest of the Javascript unless you want to customize it for your use. Now that the simple stuff is out of the way, let’s start talking about what the rest of the Javascript is doing.
embedVideo: function() {
  var videoOptions = {};

  // Add the crop fill plugin to the videoOptions

  Wistia.obj.merge(videoOptions, {
    plugin: {
      cropFill: {
        src: "//fast.wistia.com/labs/crop-fill/plugin.js"
      }
    }
  });

  // Video in the background

  wistiaEmbed = Wistia.embed(fullScreenVideo.backgroundVideo, videoOptions);

  // Video to be shown in the overlay

  overlayEmbed = Wistia.embed(fullScreenVideo.overlayVideo, videoOptions);

  // We load the thumbnail in the background while we wait
  // for the video to load and play. Once loaded, we pause, reset to
  // frame zero, show the video then play it.

  wistiaEmbed.bind('play', function() {
    wistiaEmbed.pause();
    wistiaEmbed.time(0);
    $(fullScreenVideo.backgroundVideoDiv).css(’visibility’, ’visible’);
    wistiaEmbed.play();
    return this.unbind;
  });
}
The embedVideo function does a few different things that are important to this page. First, it sets up the videoOptions, which contains the Crop Fill plugin from Wistia Labs. This plugin will ensure that your video fills the window of the browser.
// Add the crop fill plugin to the videoOptions
Wistia.obj.merge(videoOptions, {
  plugin: {
    cropFill: {
      src: '//fast.wistia.com/labs/crop-fill/plugin.js'
    }
  }
});
Next, we initialize the two embeds that we have on the page, making sure to include the options we just defined with the Crop Fill plugin.
// Video in the background
wistiaEmbed = Wistia.embed(fullScreenVideo.backgroundVideo, videoOptions);
// Video to be shown in the overlay
overlayEmbed = Wistia.embed(fullScreenVideo.overlayVideo, videoOptions);
Last, we wait for the background video to be loaded and start playing. Since that video is behind the thumbnail image, we need to rearrange the divs so the video is playing. We do this by binding to the play action of the background video which is set to autoplay. When the video starts to play, we pause it, reset the frame to zero, make the video visible, and then play the video. If we don’t pause the video and reset it back to frame zero you would see a strange jerking motion when we switch to the video. Pausing the video will allow the visitor to not notice the switch from thumbnail to video because they are an exact match.
wistiaEmbed.bind('play', function() {
  wistiaEmbed.pause();
  wistiaEmbed.time(0);
  $(fullScreenVideo.backgroundVideoDiv).css('visibility', 'visible');
  wistiaEmbed.play();
  return this.unbind;
});
The playVideo function is called when the visitor clicks on the play button. We make sure the video is visible and that it fills the browser window. After we check that the text and play button are hidden, we play the overlay video.
playVideo: function() {
  $(fullScreenVideo.overlayVideoDiv).css('left', 0).css('visibility', 'visible');
  overlayEmbed.plugin.cropFill.resize();
  $('#text').css({ opacity: 0 });
  $('#ex').css('right', 24);
  overlayEmbed.play();
}
The exitVideo function does the exact opposite of the playVideo function. We pause the video, hide the video, and make the text and play button visible. Since we paused the video, it will start in the same place if the visitor decides to hit play again.
exitVideo: function() {
  $(fullScreenVideo.overlayVideoDiv).css('left', -3000).css('visibility', 'hidden');
  $("#ex").css('right', -3000);
  $("#text").css({ opacity: 1 });
  overlayEmbed.pause();
  overlayEmbed._keyBindingsActive = false;
}
The fixTextPosition function makes sure that the play button and text included in that container are centered vertically and horizontally on the page. We also have a hook later on that will bind this function to when the visitor resizes the page. This function is responsible for the video and play button always being centered in the window.
Overall, this Javascript takes care of a large number of tasks that really make the page come together. Now that the elements are in place that control how the videos work, we’ll focus on how the page is styled with CSS.
CSS: styling
The CSS code is something you won’t have to change at all, unless you add some of your own text or adjust the IDs or classes of the divs.
The one thing you may have to change is the name of your background image. If you changed the file name, change the CSS located here:
.hello #main-image {
  position: absolute;
  top: 0;
  left: 0;
  z-index: 3;
  background-image: url(../images/main.jpg);
  background-repeat: no-repeat;
  background-position: 50% 50%;
  background-size: cover;
}
An important thing to remember is that we are putting divs on top of divs using positioning and z-indexes. That is where the diagram in the introduction comes into to play in understanding how those divs are being shuffled by the Javascript.
With the adjustments of this CSS, you should have a complete page that loads your videos.
Considerations
Along the way, we have encountered a few different considerations and tricks that we wanted to bring to your attention to help make the experience for you and your visitors a great one.
Load time
Videos on the web don’t load immediately, so before the video plays, you need to load a still image of the first frame so viewers don’t encounter a white background while the video loads. This will create the illusion that the video is just paused while it renders.
Short background videos
When your visitor loads your page, the complete background video will be loaded from Wistia. If you are using a long and large background video, you will consume a large amount of bandwidth in your account. To decrease the amount of bandwidth each visitor consumes, select a video that is no longer than 30 seconds.
Prepare for cutoff
Always try to keep your main subjects within the middle 40% of the frame, as the areas in red below are sections that could be clipped. This will ensure that your video makes sense across a large variety of window sizes.
Mobile visitors
The implementation described here does not work with mobile devices like iPhones, Android devices, and iPads. Many mobile device manufacturers (like Apple) do not allow videos to autoplay, in order to help people maintain control over how much data they use on wireless data plans. For the Wistia site, we detect whether the viewer is using a mobile device and load a similar version of the page as a backup, using a static background image in place of the video. When a visitor clicks on the call to action, a Wistia popover embed is shown instead of the fullscreen video.
The code samples I shared above don’t include how to create a mobile fallback, since it depends on your codebase and how your application is built. Seek out the help of a developer if you want to try something similar!
Test, test, test
While video backgrounds can add a cool effect to your website, they may also distract from the end goal you have for your visitors.
If you have any calls to action on the pages with your new video background, please be sure to test them against a static non-video background page. The last thing you want to do is launch something that gets a lot of buzz but reduces the conversion rate or effectiveness of your page.
I’d also suggest testing the video background to see if different videos have different effects on your visitors. Just like any page on your website, you should always continue to tweak and test.
Background videos can add a unique touch to your website and put your product front and center for visitors. With the code samples and tips above, you should be on your way to creating a distinct experience for your visitors.


